
Capacitors are essential components in various electronic circuits, performing crucial functions such as energy storage, filtering, and smoothing. Maintaining the health of these components is vital for the optimal performance of electronic devices. This comprehensive guide will delve into the intricacies of capacitor testing, empowering you with the knowledge and techniques to effectively evaluate their functionality.
Throughout this guide, we will explore different testing methods, from basic visual inspections to advanced ESR measurements. We will also discuss common capacitor failures, troubleshooting techniques, and safety precautions to ensure a safe and successful testing experience.
Basic Capacitor Testing
Capacitors are electrical components that store electrical energy in an electric field. They are used in a wide variety of electronic circuits, including power supplies, filters, and timing circuits. There are many different types of capacitors, each with its own unique characteristics.
Visual Inspection
The first step in testing a capacitor is to visually inspect it. Look for any signs of damage, such as cracks, bulges, or leaks. If you see any damage, the capacitor should be replaced.You can also check the capacitor’s value by looking at its markings.
The value of a capacitor is typically printed on its body in microfarads (µF). If you don’t see a value printed on the capacitor, you can measure it using a multimeter.
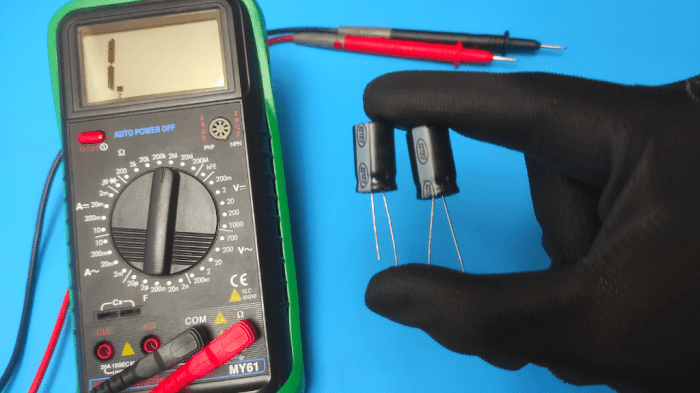
Using a Multimeter to Test a Capacitor

A multimeter is a versatile tool that can be used to test a variety of electronic components, including capacitors. When testing a capacitor, it is important to use the correct settings on the multimeter and to follow the proper procedures.
Otherwise, you may get inaccurate results or even damage the capacitor.
Multimeter Settings
When testing a capacitor, you will need to set the multimeter to the capacitance setting. This setting is typically denoted by a symbol that looks like a capacitor (two parallel lines with a gap in between). The capacitance setting will usually have a range of values that it can measure, such as from 1nF to 100uF.
You will need to select the range that is appropriate for the capacitor you are testing.
Measuring Capacitance
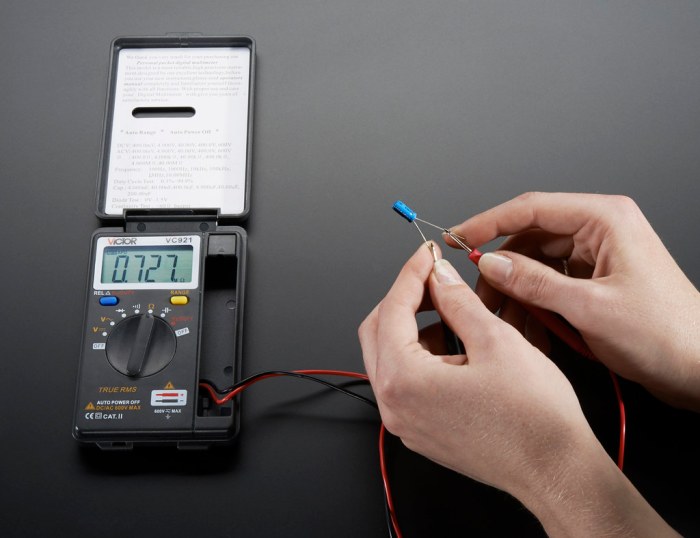
To measure the capacitance of a capacitor, you will need to connect the multimeter leads to the capacitor terminals. The positive lead of the multimeter should be connected to the positive terminal of the capacitor, and the negative lead of the multimeter should be connected to the negative terminal of the capacitor.
Once the multimeter is connected, you will need to press the “Measure” button. The multimeter will then display the capacitance of the capacitor in farads (F).
Testing for Continuity
In addition to measuring capacitance, you can also use a multimeter to test a capacitor for continuity. Continuity testing is used to determine if there is a complete electrical path between the two terminals of a capacitor. To test for continuity, you will need to set the multimeter to the continuity setting.
This setting is typically denoted by a symbol that looks like a diode (a triangle with a line through it). Once the multimeter is set to the continuity setting, you will need to connect the multimeter leads to the capacitor terminals.
If there is a complete electrical path between the two terminals, the multimeter will beep.
Advanced Capacitor Testing
Equivalent Series Resistance (ESR)
Equivalent series resistance (ESR) is a measure of the internal resistance of a capacitor. It is important to test ESR because it can affect the performance of the capacitor. High ESR can cause the capacitor to overheat and fail.
Measuring ESR
ESR can be measured using an ESR meter. An ESR meter is a specialized instrument that measures the resistance of a capacitor at a specific frequency. The frequency used for ESR testing is typically 100 kHz.
Importance of ESR Testing
ESR testing is especially important for electrolytic capacitors. Electrolytic capacitors are prone to developing high ESR over time. This is because the electrolyte in electrolytic capacitors can dry out, which increases the resistance of the capacitor.
Troubleshooting Capacitor Failures

Capacitors are passive components that store electrical energy in an electric field. They are used in a wide variety of electronic circuits, including power supplies, filters, and timing circuits. Capacitors can fail for a number of reasons, including:
- Overvoltage
- Overcurrent
- Overheating
- Mechanical damage
- Aging
When a capacitor fails, it can cause a variety of problems, including:
- Loss of power
- Circuit malfunction
- Fire
It is important to be able to troubleshoot capacitor failures in order to prevent these problems.
Troubleshooting a Circuit with a Failed Capacitor
The first step in troubleshooting a circuit with a failed capacitor is to identify the symptoms of the failure. Some common symptoms of capacitor failure include:
- Bulging or leaking capacitor
- Scorched or discolored capacitor
- Circuit malfunction
- Loss of power
Once you have identified the symptoms of the failure, you can begin to troubleshoot the circuit. The following steps will help you troubleshoot a circuit with a failed capacitor:
- Visually inspect the capacitor for any signs of damage.
- Use a multimeter to test the capacitor.
- Replace the capacitor if it is found to be faulty.
Tips on Preventing Capacitor Failures
There are a number of things you can do to prevent capacitor failures, including:
- Use capacitors that are rated for the voltage and current requirements of the circuit.
- Avoid exposing capacitors to high temperatures.
- Handle capacitors with care to avoid mechanical damage.
- Replace capacitors that are showing signs of aging.
By following these tips, you can help to prevent capacitor failures and ensure that your electronic circuits operate reliably.
Safety Precautions
Capacitors can store a significant amount of electrical energy, which can be dangerous if not handled properly. Before working with capacitors, it is essential to understand the potential hazards and take appropriate safety precautions.The primary hazard associated with capacitors is electrical shock.
When a capacitor is charged, it stores electrical energy in its electric field. If the capacitor is discharged suddenly, a large current can flow, which can cause electrical shock or even electrocution.To safely discharge a capacitor, use a resistor to gradually release the stored energy.
A resistor limits the current flow and prevents the capacitor from discharging too quickly. To discharge a capacitor using a resistor, connect the resistor in parallel with the capacitor. The resistor should have a resistance that is high enough to limit the current to a safe level, but low enough to allow the capacitor to discharge within a reasonable amount of time.It
is also important to wear proper safety gear when working with capacitors. This includes safety glasses, gloves, and insulated tools. Safety glasses protect your eyes from flying debris in case the capacitor explodes. Gloves protect your hands from electrical shock.
Insulated tools prevent you from coming into contact with live electrical components.
Capacitor Discharge Methods

Discharging a capacitor is crucial for safety and to prevent damage to the capacitor or connected components. Here are various methods to discharge a capacitor:
Using a Resistor
Discharging a capacitor using a resistor is a simple and safe method. It involves connecting a resistor across the capacitor terminals.
- Choose a suitable resistor: Select a resistor with a resistance value high enough to limit the discharge current to a safe level, typically around 100 ohms or higher.
- Connect the resistor: Connect the resistor across the capacitor terminals, ensuring correct polarity (positive to positive, negative to negative).
- Discharge the capacitor: Allow the capacitor to discharge through the resistor. The discharge time depends on the capacitance and the resistance value.
- Verify discharge: Once the capacitor is discharged, use a multimeter to measure the voltage across the terminals. It should read close to zero.
Advantages:
- Simple and safe method
- Limits discharge current
- Suitable for most capacitors
Disadvantages:
- Can take time to discharge large capacitors
- Resistor dissipates energy as heat
Capacitor Charging Methods
Capacitors store electrical energy in an electric field. Charging a capacitor involves applying a voltage across its terminals, causing the accumulation of opposite charges on its plates. The charging process is influenced by voltage, current, and the capacitor’s capacitance.
Different techniques exist for charging capacitors, each with its advantages and disadvantages. These methods include:
Constant Voltage Charging
- Involves applying a constant voltage source across the capacitor.
- The capacitor charges exponentially, with the initial charging rate being high and gradually decreasing as the capacitor approaches its maximum charge.
- Provides precise control over the charging voltage.
- Can be slow for large capacitors.
Constant Current Charging
- Involves applying a constant current source to the capacitor.
- The capacitor charges linearly, with the charging rate being constant throughout the process.
- Provides faster charging compared to constant voltage charging.
- Can be more difficult to control the charging current accurately.
Pulse Charging
- Involves applying a series of voltage or current pulses to the capacitor.
- Can be used to charge capacitors more quickly than constant voltage or constant current charging.
- Requires specialized circuitry to generate the pulses.
- Can introduce voltage or current spikes that may damage the capacitor.
Comparison of Capacitor Charging Methods
| Method | Advantages | Disadvantages |
|---|---|---|
| Constant Voltage Charging | Precise voltage control, simple circuitry | Slow charging for large capacitors |
| Constant Current Charging | Faster charging, linear charging rate | Difficult to control charging current accurately |
| Pulse Charging | Fast charging, can handle large capacitors | Specialized circuitry required, potential for damage |
Capacitor Applications
Capacitors find widespread applications in various electronic circuits, playing crucial roles in filtering, smoothing, and energy storage. Their unique ability to store and release electrical energy makes them essential components in many devices.Capacitors are commonly used in power supplies to filter out unwanted voltage fluctuations and provide a smooth, stable voltage output.
They also play a vital role in audio circuits, where they filter out noise and improve sound quality. In timing circuits, capacitors control the charging and discharging time, determining the frequency and duration of signals.In energy storage applications, capacitors can store large amounts of energy and release it quickly when needed.
They are used in camera flashes, portable defibrillators, and electric vehicles to provide bursts of power.
Capacitor Usage in Real-World Devices
Capacitors are ubiquitous in modern electronic devices, including:
- Power supplies: Filtering and smoothing voltage
- Audio circuits: Noise reduction and sound quality enhancement
- Timing circuits: Controlling signal frequency and duration
- Camera flashes: Storing energy for high-intensity light output
- Portable defibrillators: Providing life-saving shocks
- Electric vehicles: Storing and releasing energy for propulsion
Capacitor Design Considerations
When selecting a capacitor for a specific application, several factors must be considered to ensure optimal performance and reliability. These factors include capacitance, voltage rating, temperature range, and physical size.
Capacitance is the ability of a capacitor to store electrical charge. It is measured in farads (F) and determines the amount of charge that can be stored on the capacitor’s plates. The voltage rating of a capacitor specifies the maximum voltage that can be applied across its terminals without causing damage.
It is important to select a capacitor with a voltage rating that is higher than the expected operating voltage.
The temperature range of a capacitor specifies the range of temperatures over which it can operate reliably. Capacitors can be affected by temperature changes, which can cause changes in capacitance and voltage rating. It is important to select a capacitor with a temperature range that is compatible with the expected operating conditions.
The physical size of a capacitor is also an important consideration. Capacitors come in a variety of sizes, from small surface-mount devices to large electrolytic capacitors. The physical size of the capacitor must be compatible with the available space in the application.
Key Design Considerations
| Design Consideration | Description |
|---|---|
| Capacitance | The ability of a capacitor to store electrical charge. |
| Voltage Rating | The maximum voltage that can be applied across the capacitor’s terminals without causing damage. |
| Temperature Range | The range of temperatures over which the capacitor can operate reliably. |
| Physical Size | The physical size of the capacitor must be compatible with the available space in the application. |
Capacitor Datasheets
Capacitor datasheets are essential documents that provide detailed information about the electrical characteristics, physical dimensions, and performance specifications of a particular capacitor model. They are invaluable resources for engineers, technicians, and anyone working with capacitors.
Capacitor datasheets typically include the following sections:
General Information
- Capacitance value and tolerance
- Voltage rating
- Dielectric material
- Physical dimensions
- Mounting style
Electrical Characteristics
- Capacitance vs. temperature curve
- Equivalent series resistance (ESR)
- Equivalent series inductance (ESL)
- Dissipation factor
- Insulation resistance
Performance Specifications
- Ripple current rating
- Surge current rating
- Lifetime expectancy
- Operating temperature range
- Storage temperature range
Tips for Interpreting Capacitor Datasheet Information
- Always check the datasheet for the specific capacitor model you are using.
- Pay attention to the tolerance value, which indicates the allowable variation in capacitance.
- Consider the voltage rating, which determines the maximum voltage that the capacitor can safely withstand.
- Select the appropriate dielectric material based on the desired performance characteristics.
- Choose the correct physical dimensions and mounting style for your application.
Conclusion
Mastering capacitor testing is a valuable skill for anyone working with electronic circuits. By following the steps Artikeld in this guide, you can confidently assess the condition of capacitors, identify potential issues, and ensure the reliability of your electronic devices.
Remember to prioritize safety, use appropriate tools, and consult datasheets for specific capacitor specifications. With a thorough understanding of capacitor testing, you can effectively maintain and troubleshoot electronic circuits, maximizing their performance and longevity.