
Booting from a USB drive is a crucial skill for HP users, whether you’re troubleshooting system issues, installing a new operating system, or recovering lost data. This guide will provide a step-by-step explanation of how to boot from USB on HP devices, covering various BIOS configurations, USB drive preparation, boot sequence settings, and troubleshooting techniques.
With clear instructions and comprehensive troubleshooting tips, this guide will empower you to successfully boot from USB on your HP device, ensuring a seamless and efficient computing experience.
BIOS Configuration
Booting your HP device from a USB drive requires accessing and modifying the BIOS settings. BIOS (Basic Input/Output System) is a firmware that initializes the hardware components and loads the operating system. Here’s how to access the BIOS and enable USB boot on various HP devices:
Accessing BIOS
- Desktops and All-in-Ones: Press the “F10” key repeatedly during startup.
- Laptops: Press the “F1” or “F2” key during startup, or press the “Esc” key to access the Startup Menu and select “BIOS Setup.”
Enabling USB Boot
- Main Menu: Once in the BIOS, navigate to the “Boot” or “Boot Order” menu.
- USB Boot Option: Look for an option labeled “USB Boot” or “Removable Devices.” Ensure it’s enabled and set as the primary boot device.
- Save and Exit: Once USB boot is enabled, save your changes and exit the BIOS. Your HP device will now boot from the USB drive.
USB Drive Preparation

Creating a bootable USB drive involves preparing a USB drive with a bootable operating system image. This can be done using various methods:
- Rufus: Rufus is a popular tool specifically designed for creating bootable USB drives. It supports various file systems and can be used to format the USB drive and copy the ISO file to it.
- Etcher: Etcher is another tool that can be used to create bootable USB drives. It is open-source and supports a wide range of operating systems, including Windows, macOS, and Linux.
- UNetbootin: UNetbootin is a cross-platform tool that can be used to create bootable USB drives from ISO files or distribution URLs.
Once you have selected a method, you can follow the instructions provided by the tool to create a bootable USB drive. Generally, the process involves formatting the USB drive, selecting the ISO file, and copying the contents of the ISO file to the USB drive.
Rufus
Rufus is a user-friendly tool that provides a straightforward interface for creating bootable USB drives. Here are the steps to create a bootable USB drive using Rufus:
- Download Rufus from its official website.
- Insert the USB drive into your computer.
- Launch Rufus and select the USB drive from the “Device” drop-down menu.
- Select the “Boot selection” option and click on the “SELECT” button to choose the ISO file.
- Click on the “START” button to begin the process of creating the bootable USB drive.
Boot Sequence
The boot sequence refers to the order in which your HP device checks for an operating system to load and run. To boot from a USB drive, you need to ensure that the USB drive is set as the first boot device in the BIOS settings.
The BIOS (Basic Input/Output System) is a firmware program that initializes the hardware components of your computer and loads the operating system. To change the boot order in the BIOS, you will need to:
Accessing the BIOS
- Restart your HP device.
- Press the F10 key repeatedly during the startup process to enter the BIOS settings.
Changing the Boot Order
- Navigate to the Boot tab using the arrow keys.
- Use the arrow keys to select the USB drive as the first boot device.
- Press F10 to save the changes and exit the BIOS.
Troubleshooting Boot Errors
Encountering boot errors while attempting to boot from a USB drive can be frustrating. This section identifies common errors and provides practical solutions to resolve them.
Understanding the causes behind these errors is crucial. Let’s delve into the details and explore effective troubleshooting techniques.
USB Drive Not Detected
- Ensure the USB drive is securely inserted into a working USB port.
- Try using a different USB port on your computer.
- Check if the USB drive is compatible with your computer’s BIOS settings.
- Update your computer’s BIOS to the latest version.
No Boot Device Found
- Verify that the USB drive is bootable. Use a tool like Rufus or UNetbootin to create a bootable USB drive.
- Check the boot sequence in your BIOS settings and ensure that the USB drive is listed as the first boot device.
- Disable Secure Boot in your BIOS settings, as it can sometimes interfere with booting from USB drives.
Operating System Not Found
- Make sure the USB drive contains the correct operating system files.
- Check the integrity of the USB drive by running a diagnostic tool.
- Re-create the bootable USB drive using a different USB drive or a different operating system image.
Legacy vs. UEFI Boot

Legacy BIOS (Basic Input/Output System) and UEFI (Unified Extensible Firmware Interface) are two different boot modes used by computers. Legacy BIOS has been the traditional boot mode for many years, while UEFI is a newer and more modern boot mode.UEFI
offers several advantages over Legacy BIOS, including:
- Faster boot times
- Improved security
- Support for larger hard drives
- Support for more advanced features, such as Secure Boot
Most newer HP devices support both Legacy BIOS and UEFI boot modes. However, some older HP devices may only support Legacy BIOS. If you are unsure which boot mode your HP device supports, you can check the HP support website or consult your device’s user manual.To
select the appropriate boot mode for your HP device, you will need to access the BIOS settings. The steps for accessing the BIOS settings will vary depending on your HP device model. Once you have accessed the BIOS settings, you will need to find the boot mode setting and select the appropriate option.If
you are having trouble booting from a USB drive, you may need to change the boot mode setting to Legacy BIOS. You can also try disabling Secure Boot in the BIOS settings.
Boot Menu
To boot from a USB drive on HP devices, you need to access the boot menu during the system startup.
The boot menu provides a list of available boot devices, including the USB drive, hard drive, and optical drive. From the boot menu, you can select the USB drive as the boot device, which will then load the operating system or installation media from the USB drive.
Accessing the Boot Menu
The method for accessing the boot menu may vary slightly depending on the specific HP device model.
- On most HP devices, you can access the boot menu by pressing the F9 key during the system startup.
- On some HP devices, you may need to press the F10 or Esc key to access the boot menu.
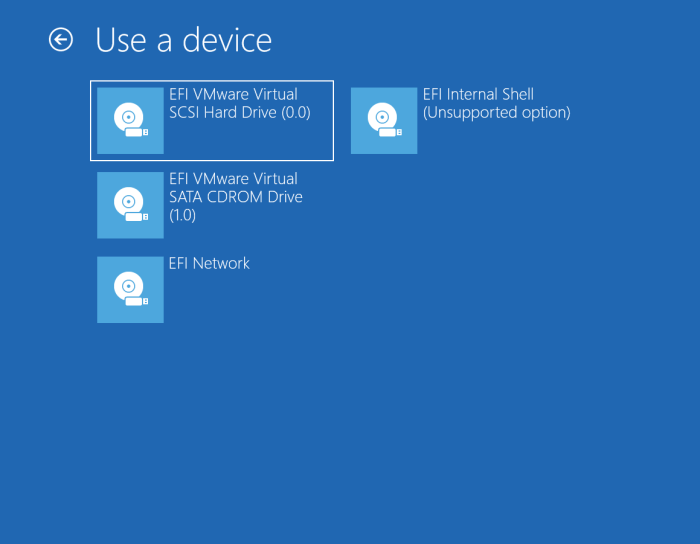
Selecting the USB Drive
Once you have accessed the boot menu, you should see a list of available boot devices.
- Use the arrow keys to navigate the list and select the USB drive.
- Once the USB drive is selected, press the Enter key to boot from the USB drive.
HP BIOS and the BIOS Menu
The BIOS is a firmware program that initializes the computer’s hardware components and starts the operating system. The BIOS menu allows you to change the boot order, set passwords, and change other computer settings.
HP BIOS and the BIOS Menu
The BIOS is a firmware program that initializes the computer’s hardware components and starts the operating system. The BIOS menu allows you to change the boot order, set passwords, and change other computer settings.
HP BIOS and the BIOS Menu
The BIOS is a firmware program that initializes the computer’s hardware components and starts the operating system. The BIOS menu allows you to change the boot order, set passwords, and change other computer settings.
HP BIOS and the BIOS Menu
The BIOS is a firmware program that initializes the computer’s hardware components and starts the operating system. The BIOS menu allows you to change the boot order, set passwords, and change other computer settings.
Secure Boot

Secure Boot is a security feature designed to prevent unauthorized operating systems and bootloaders from loading on a computer. It works by verifying the digital signature of the boot software before allowing it to execute. This helps to protect against malware and rootkits that can compromise a system at the boot level.
However, Secure Boot can also prevent you from booting from USB drives, especially if the USB drive is not signed by a trusted authority. If you need to boot from a USB drive, you may need to disable Secure Boot in the BIOS.
Disabling Secure Boot on HP Devices
To disable Secure Boot on an HP device, follow these steps:
- Restart your computer and press the F10 key repeatedly during the boot process to enter the BIOS.
- Navigate to the Security tab.
- Locate the Secure Boot setting and set it to Disabled.
- Press F10 to save your changes and exit the BIOS.
Once you have disabled Secure Boot, you should be able to boot from a USB drive without any problems.
USB Drive Compatibility
When selecting a USB drive for booting an HP device, compatibility is crucial. HP devices have specific requirements for USB drives to ensure successful booting.
Recommended USB Drives
For optimal compatibility, HP recommends using USB drives that meet the following specifications:
- USB 2.0 or USB 3.0 compliant
- Formatted with a FAT32 or NTFS file system
- Capacity of 4GB or larger
- Free of any viruses or malware
Advanced Boot Options
The HP BIOS offers a range of advanced boot options that can be used to troubleshoot boot issues, access recovery tools, and configure boot settings. These options are available by pressing the F9 key during the boot process.
Troubleshooting Boot Issues
The advanced boot options include several tools that can help troubleshoot boot issues, such as:
-
-*System Diagnostics
Runs a series of tests to check the hardware and software components of the computer.
-
-*Last Known Good Configuration
Restores the computer to the last known good configuration, which can be helpful if the computer is not booting properly due to a recent change in the BIOS settings.
-*Boot Device Options
Allows you to select the boot device, such as a USB drive or DVD, from which the computer will boot.
Accessing Recovery Tools
The advanced boot options also provide access to recovery tools, such as:
-
-*System Recovery
Allows you to restore the computer to its factory settings.
-
-*Command Prompt
Provides a command-line interface that can be used to troubleshoot boot issues and perform other advanced tasks.
-*Startup Repair
Attempts to repair any problems that are preventing the computer from booting properly.
Configuring Boot Settings
The advanced boot options also allow you to configure boot settings, such as:
-
-*Boot Order
Specifies the order in which the computer will attempt to boot from different devices.
-
-*Fast Boot
Enables or disables the Fast Boot feature, which speeds up the boot process by skipping certain initialization steps.
Last Recap
Mastering the art of booting from USB on HP devices opens up a world of possibilities. From troubleshooting system issues to installing new software, you’ll be equipped to handle a wide range of computing challenges. Remember to carefully follow the steps Artikeld in this guide, and don’t hesitate to seek further assistance if needed.
With a thorough understanding of the process, you’ll be able to confidently boot from USB and unlock the full potential of your HP device.
-*Secure Boot
Enables or disables the Secure Boot feature, which helps protect the computer from malware and unauthorized software.